
Silly Hand Puppets
Here is a link to a blog for the "monster" patterns, please note this is in American terminology and has been left this way because there are also good photos. This is an intermediate level pattern, so not one that a beginner to crochet should try.
Please remember for our project purposes buttons or "boggle" eyes are not allowed.
byjennidesigns.blogspot.com/2015/05/free-crochet-pattern-little-cs-silly.html?spref=pi
There is a fantastic blog by Rilla Edwards that contains loads of puppet patterns (the link is below). Please remember this is an American site, so using American terminology. The Farm Animal patterns below are in UK terminology.
Once you have got the basic "glove" be as creative as you like.
Once you have got the basic "glove" be as creative as you like.
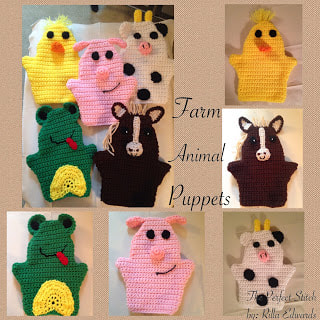
Farm Animal Hand Puppets
Design by Rilla Edwards
Farm Animal Hand Puppets Pattern
Size: Each puppet measures approximately 9" tall
Materials:
--4.5mm hook
--DK yarn in white, black, yellow, orange, red, pink, green, brown, tan/light brown
--small amount of polyfil (for cow, horse and pig's nose)
--tapestry needle for weaving
Stitch Abbreviations:
Ch: chain
St: stitch(es)
Sl st: slip stitch
Sk: skip
DC: single crochet
DC2tog: single crochet 2 stitches together (creates a decrease)
DC3tog: single crochet 3 stitches together (creates a decrease)
HTC: half double crochet
Rep: repeat
MR: magic ring
FO: fasten off
Directions:
Before assembling your puppets, be sure to read through the directions. The facial features are added before the front and back pieces are joined together. The ears, horns, hair are added after the front and back pieces are joined together...
Basic Puppet Pattern - make 2 pieces (front & back)
1. Ch21. DC in 2nd ch from hook and across. Ch1 and turn. (20)
2-10. 1 DC in each st across. Ch1 and turn. (20)
11. 2 DC in first st, 1 SC in next 18 st and 2 SC in the last st. Ch1 and turn. (22)
12. 1 DC in each st across. Ch1 and turn. (22)
13. 2 DC in first st, 1 SC in next 20 st and 2 SC in the last st. Ch1 and turn. (24)
14. 1 DC in each st across. Ch1 and turn. (24)
15. 2 DC in first st, 1 SC in next 22 st and 2 SC in the last st. Ch1 and turn. (26)
16. 1 DC in each st across. Ch1 and turn. (26)
17. 2 DC in first st, 1 SC in next 24 st and 2 SC in the last st. Ch1 and turn. (28)
18. 1 DC in each st across. Ch1 and turn. (28)
19. 2 DC in first st, 1 SC in next 26 st and 2 SC in the last st. Ch1 and turn. (30)
20. 1 DC in each st across. FO and weave ends. (30)
21. Sk the first 6 st. Join yarn in next st and Ch1. 1 DC in same st as Ch1 and into the next 17 st. Ch1 and turn. (18)
22-27. 1 DC in each st across. Ch1 and turn. (18)
28. DC2tog, 1 SC in next 14 st, DC2tog. Ch1 and turn. (16)
29. 1 DC in each st across. Ch1 and turn. (16)
30. DC2tog, 1 DC in next 12 st, DC2tog. Ch1 and turn. (14)
31. 1 D in each st across. Ch1 and turn. (14)
32. DC2tog, 1 DC in next 10 st, DC2tog. Ch1 and turn. (12)
33. 1 DC in each st across. Ch1 and turn. (12)
34. DC2tog, 1 SC in next 8 st, DC2tog. Ch1 and turn. (10)
35. 1 DC in each st across. Ch1 and turn. (10)
36. DC2tog, 1 SC in next 6 st, DC2tog. Ch1 and turn. (8)
37. 1 DC in each st across. FO and leave a long tail for attaching front and back together. (8)
-- Do not join the front and back pieces together yet --
Assembly Directions:
1. First, you will want to make and add your facial features to the front side of one piece.
2. Next, you will place the right sides together and whipstitch up the side, across the top and down the other side together.
3. Then, you will turn right sides out and attach the ears, horns and/or hair (and eyes for the frog).
A. Cow:
Eyes (make 2):
1. With black yarn, 6 DC into MR. Sl st join to first st and FO. Leave tail for attaching. (6)
Horns (make 2):
1. With yellow yarn, 6 DC into MR. Sl st join to first st and Ch1. (6)
2-4. 1 DC in each st around. Sl st join to first st and Ch1. At the end of Round 4, FO and leave a long enough tail for attaching. (6)
Nose:
1. With pink yarn, 6 DC into MR. Sl st join to first st and Ch1. (6)
2. 2 DC in each st around. Sl st join to first st and Ch1. (12)
3. 1 DC in each st around. Sl st join and FO. Leave a long enough tail for attaching.
4. Use black yarn and embroider nostrils (see pic for help)
Ears (make 2):
(I made 1 black and 1 white)
1. 6 DC into MR. Sl st join to first st and Ch1. (6)
2. 2 DC in each st around. Sl st join to first st and Ch1. (12)
3-4. 1 DC in each st around. Sl st join to first st and Ch1. At the end of Round 4, FO and leave a long enough tail for attaching.
Spots:
Small (2):
1. With black yarn, 6 DC into MR. Sl st join to first st and Ch1. (6)
2. 2 DC in first st, 1 DC in next st. Rep around. Sl st join and FO. Leave a long enough tail for attaching. (9)
Large (1):
1. With black yarn, 6 DC into MR. Sl st join to first st and Ch1. (6)
2. 2 DC in each st around. Sl st join and FO. Leave a long enough tail for attaching. (12)
Assembly:
1. Attach eyes.
2. Attach nose. Before closing up, add a small amount of polyfil.
3. Attach spots.
4. Attach front and back sides together. See above for further explanation on how to do this.
5. Attach horns at the top.
6. Attach ears on each side.
B. Chick:
Eyes (make 2):
1. With black yarn, 6 DC into MR. Sl st join to first st and FO. Leave tail for attaching. (6)
Beak:
1. With orange yarn, 6 DC into MR. Sl st join to first st and Ch1. (6)
2. 2 DC in first st, 1 DC in each of the next 5 st. Sl st join to first st and Ch1. (7)
3. 2 DC in first st, 1 DC in each of the next 6 st. Sl st join to first st and Ch1. (8)
4. 2 DC in first st, 1 DC in each of the next 7 st. Sl st join to first st and Ch1. (9)
5. 2 DC in first st, 1 DC in each of the next 8 st. Sl st join to first st and FO. Leave a long enough tail for attaching. (10)
Hair:
(attach hair strands after the front/back are whipstitched together)
1. Weave strands of yarn at the top and tie each strand into a double knot. Use your tapestry needle to fray the strands.
Assembly:
1. Attach eyes.
2. Attach beak.
3. Attach front and back sides together. See above for further explanation on how to do this.
4. Attach hair.
C. Pig:
Eyes (make 2):
1. With black yarn, 6 DC into MR. Sl st join to first st and FO. Leave tail for attaching. (6)
Snout:
1. 6 DC into MR. Sl st join to first st and Ch1. (6)
2. 2 DC in each st around. Sl st join to first st and Ch1. (12)
3. 1 DC in each st around. Sl st join to first st and FO. Leave a long enough tail for attaching. (12)
Ears (make 2):
1. 6 DC into MR. Sl st join to first st and Ch1. (6)
2. 1 DC in each st around. Sl st join to first st and Ch1. (6)
3-4. Rep #2. (6)
5. DC2tog, SC next st. Rep around. Sl st join to first st and Ch1. (4)
6. 1 DC in each st around. Sl st join to first st and FO. Leave a long enough tail for attaching. (4)
Mouth:
1. With black yarn, embroider. (see pic)
Assembly:
1. Attach eyes.
2. Attach snout. Before closing up, add a small amount of polyfil.
3. Embroider mouth.
4. Attach front and back sides together. See above for further explanation on how to do this.
5. Attach ears to each side.
D. Frog:
Inner Eyes (make 2):
1. With black yarn, 6 DC into MR. Sl st join to first st and FO. Leave tail for attaching. (6)
Outer Eyes (make 2):
1. With green yarn, 6 DC into MR. Pull to tighten but do not join together. Ch1 and turn. (6)
2. 2 SC in first st, 1 DC in next 4 st, 2 DC in last st. Ch1 and turn. (8)
3. 2 DC in first st, 1 DC in next 6 st, 2 DC in last st. Ch1 and turn. (10)
4-5. 1 DC in each st across. Ch1 and turn. At the end of Round 5, FO. Leave a long enough tail for attaching.
Attach Inner Eye to the center of the Outer eye.
Tongue:
1. With red yarn, Ch6. DC in 2nd ch from hook and across. FO and leave a long enough tail for attaching. (5)
Stomach:
1. With yellow yarn, 6 DC into MR. Pull to tighten but do not join together. Ch1 and turn. (6)
2. 2 DC in each st across. Ch1 and turn. (12)
3. 2 DC in each st across. Ch1 and turn. (24)
4. 2 DC in first st, 1 SC in next st. Rep across. Ch1 and turn. (36)
5. 1 DC in each st across and then continue to evenly work 1 DC across the bottom. Sl st join to first st and FO. Leave a long enough tail for attaching.
Mouth:
1. With black yarn, embroider.
Assembly:
1. Attach mouth and tongue.
2. Attach stomach. It's a good idea to pin this to hold in place while attaching.
3. Attach front and back sides together. See above for further explanation on how to do this.
4. Attach eyes to each side at the top.
E. Horse:
Eyes (make 2):
1. With black yarn, 6 DC into MR. Sl st join to first st and FO. Leave tail for attaching. Embroider eye center with white yarn. (6)
Ears (make 2):
1. With light tan/beige yarn, Ch5. DC in 2nd ch from hook and across. Ch1 and turn. (4)
2. 1 DC in each st across. Ch1 and turn. (4)
3. SD2tog, 1 SC in next 2 st. Ch1 and turn. (3)
4. 1 DC in each st across. Ch1 and turn. (3)
5. DC3tog. Ch1 and turn. (1)
6. 1 DC in st. FO and join dark brown yarn. Ch1 and turn. (1)
7. 1 DC in each st around ear. FO and leave a long enough tail for attaching.
Nose Stripe:
1. With light tan/beige yarn, Ch11. HTC in the 2nd ch from the hook and next 4 ch. DC in each of the last 5 ch. FO and leave a long enough tail for attaching.
Mouth:
1. With light tan/beige yarn, Ch4. DC in 2nd ch from hook and into the next ch. 3 DC in the last ch. Rotate. DC in next ch. 2 DC in the last ch. Sl st join to first st and Ch1. (8)
2. DC in the first 3 st, 3 DC in the next st, DC in the next 3 st and 2 DC in the last st. Sl st join to first st and Ch1. (11)
3. DC in the first 4 st, 3 DC in the next st, DC in the next 5 st and 2 DC in the last st. Sl st join to first st and FO. Leave a long enough tail for attaching. (14)
4. With dark brown, embroider nostrils.
5. With black yarn, embroider mouth.
Hair:
(attach hair strands after the front/back are whipstitched together)
1. Weave strands of yarn at the top (between the ears) and tie each strand into a double knot.
2. Weave strands of yarn on one side (between the ear and thumb portion) and tie each strand into a double knot. (see pic)
Assembly:
1. Attach eyes.
2. Attach nose stripe (with the HTC end on top) between the eyes, vertically. (see pic)
3. Attach mouth.
4. Attach front and back sides together. See above for further explanation on how to do this.
5. Attach ears to each side.
6. Attach hair to top and then one side.
